
Timetables & trips
The timetable editor is a grid: each row is a trip, each column is a stop, each cell is an arrival/departure time. Type the first stop's time, auto-interpolate the rest from the route geometry, and use duplicate-with-offset to spawn the repeating service. For headway-only service, the frequency editor writes frequencies.txt instead.
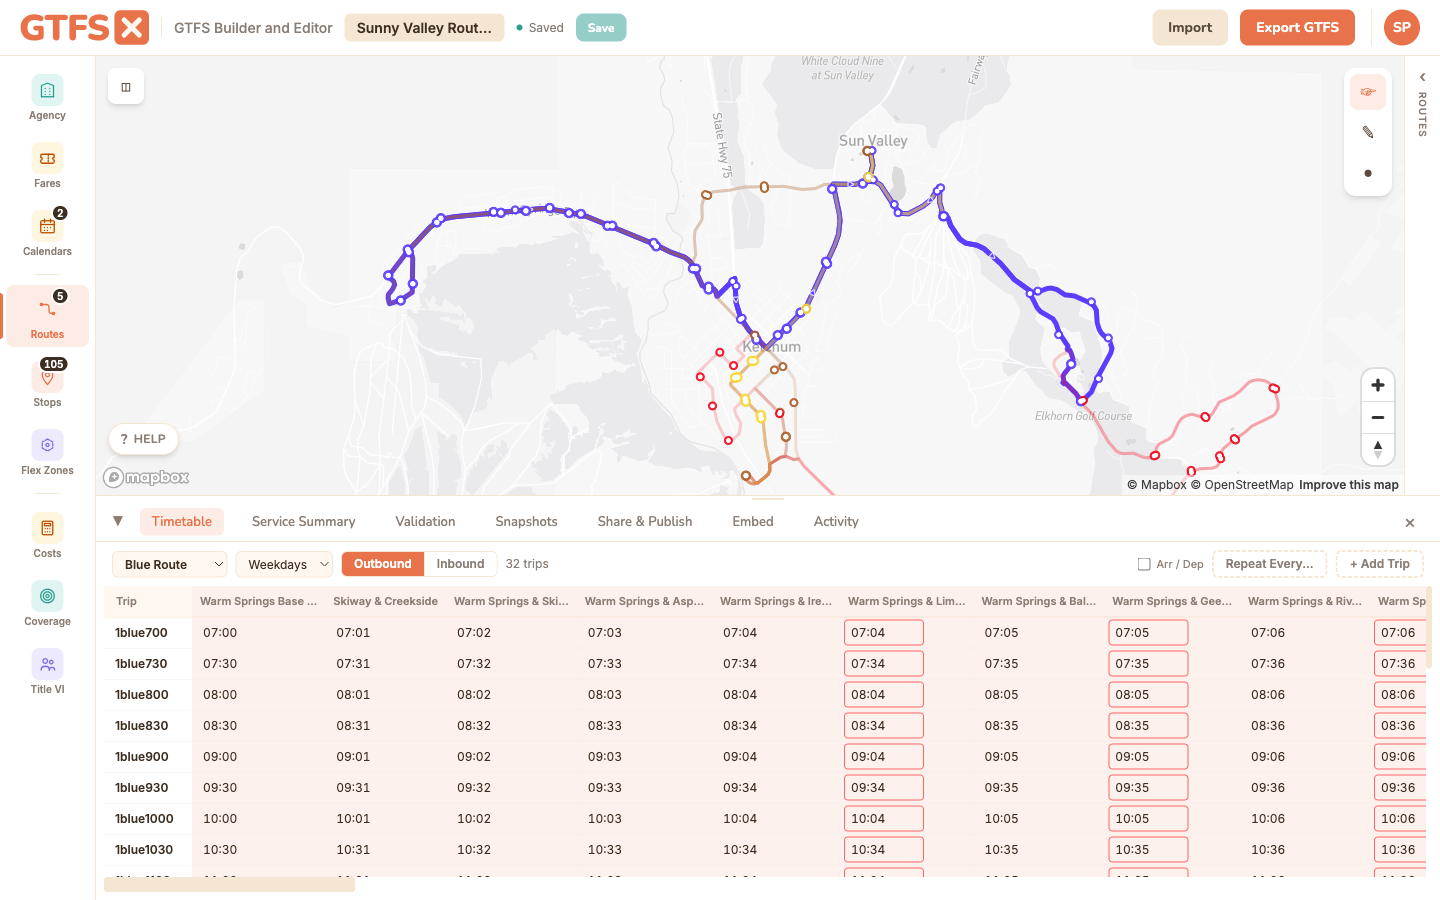
The trip grid
Open the Timetable from the bottom rail, pick a route, and the grid loads. Rows are trips; columns are the stops in stop_sequence order; cells are times in HH:MM:SS format. The editor accepts shorthand input — type 7:30 or 730 and it auto-formats to 07:30:00.
The selector at the top of the grid — a pattern dropdown — switches which trips you're editing. Each pattern has its own trip list and its own stop order — the columns are that shape's stops.
The Edit Stops button in the grid toolbar jumps straight to the route's Stops editor, where you set which stops the pattern serves and their order; the Stops tab has the reverse jump back here — an Open timetable editor button. A stop may appear more than once in a pattern — handy for a loop or out-and-back whose first and last stop are the same. Add it again from the "Add existing" picker (set Show stops from → All stops) and it becomes a second, independent column here; on export it's written as a repeated stop_id at a distinct stop_sequence.
Stop states: timed, interpolated, skipped
Every cell in the grid is one of three states. The state decides what (if anything) the export writes for that trip at that stop.
- Timed. Type a time into the cell. The trip stops there at a known clock time, and the export writes an explicit
arrival_timeanddeparture_time. (Turn on the Arr / Dep toggle to author the two separately when there's dwell.) - Interpolated. Clear the cell so it's blank. The trip still serves the stop, but you're leaving its time for the trip planner to interpolate from the timed stops on either side. The export writes a row with blank times and
timepoint=0. A trip's first and last served stops must be timed (not blank), so a downstream consumer has anchors to interpolate between. - Skipped. Hover the cell and click the small × at its top-right corner. The cell then shows a struck-through
SKIPchip: this trip does not serve that stop, and the export writes nostop_timesrow for it at all. Click the SKIP chip to restore the stop to served. Skipping is how one trip can serve a different set of stops than its siblings on the same route (a short-turn, or an express run that bypasses local stops).
The Estimate times and Interpolate times tools respect skipped stops: they compute travel time across every stop the vehicle physically passes (so the served stops downstream still get correct times) but only fill the served cells, leaving skipped stops skipped.
Creating trips
Click + Add Trip to insert a new row. Each trip needs:
- Service pattern — pick from the patterns defined in the Calendars panel.
- Direction — 0 or 1; the toggle at the top of the grid already filters.
- Headsign — the destination text riders see ("Downtown via Main", "Airport").
- First stop time — type into the leftmost cell. Everything downstream interpolates from this.
To create a series of trips at a fixed headway, fill in one trip, then click Repeat Every…. Enter a headway (15 min, 30 min, etc.) and a count; the editor spawns N copies of the trip, each offset by the headway. Much faster than typing a full weekday schedule by hand.
Interpolation
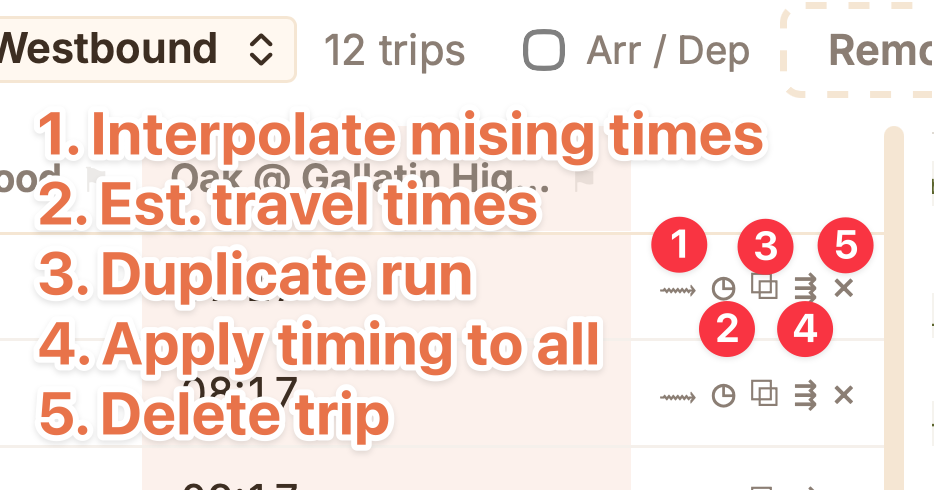
Once the first stop time is set, click the interpolate button (arrow icon at the top of the trip row) to auto-fill intermediate stop times. The editor computes the segment lengths from the route shape, divides by an assumed average speed, and fills the cells.
Default speed is configurable per trip. The default is reasonable for urban fixed-route bus; for express routes or rail you'll want a higher number. After interpolating, refine individual cells by typing — only the cell you edit changes, the surrounding interpolation stays put.
Estimate times from the road network
Interpolation divides the shape's distance by an assumed speed. Estimate times goes a step further: it asks Mapbox for the actual driving time along the road network the route follows, then turns that into a full schedule for the trip. Use it when you've drawn a snapped route and want a realistic first pass at the timetable instead of a constant-speed sketch.
Click the Estimate action on a trip row (the road-network icon) to open the dialog. Three inputs:
- Start time — when the trip departs its first stop. Pre-filled from the trip's existing first time, or
08:00for a fresh trip. Everything else is laid out forward from here. - Dwell / stop (seconds) — how long the vehicle waits at each intermediate stop for boarding. Added to the driving time between stops. Default 18 seconds. The first stop gets the start time exactly; the last stop gets no dwell (the trip ends on arrival).
- Speed factor — a multiplier on the road-network driving time to account for traffic, signals, and acceleration that the car-based
drivingprofile doesn't model. Default 1.3 (i.e. the schedule runs 30% slower than free-flow car). Raise it for congested urban service or frequent stops; lower it toward 1.0 for limited-stop or express running.
Click Estimate in the dialog and the editor matches the trip's drawn shape to the road network, projects each stop onto that matched path to get the cumulative travel time at every stop, applies the dwell and speed factor, and writes arrival/departure times across the whole row. Then use the apply-to-all-trips action (⇶) on that row to push the same stop sequence and run/dwell timing to the route's other trips — each keeps its own start time, so headways and departures are untouched.
The estimate needs a drawn route shape and at least two stops; without a snapped shape there's no road geometry to time against. It's a online call (same Map Matching API as snap-to-road), so it needs an internet connection. If Mapbox can't match the path the dialog says so and leaves the times for you to set by hand.
Treat the output as a first draft. Mapbox's driving profile is car free-flow with a flat fudge factor — it doesn't know your bus's actual dwell distribution, layover policy, or peak-direction congestion. Refine the cells that matter (timepoints especially) after estimating; the surrounding values stay put.
Frequency-based service (frequencies.txt)
For service that's described as a headway over a span ("every 10 minutes from 6am to 9pm") rather than as explicit trip times, use the Frequencies panel in the left rail. The idea: one trip you've already built in the timetable acts as the "pattern" — its stop times become the canonical reference run — and a frequency window says "repeat this trip every N minutes between a start and end time." Click + Add Headway Window and set:
- Trip — the pattern trip the window repeats.
- Start time / End time — the span the headway applies over. Times accept
HH:MM:SSand may cross midnight (enter a post-midnight time as+1 04:30). - Headway — the gap between departures, in seconds; the panel shows the minute equivalent next to it.
- Type — Frequency-based (departures are approximate, "about every 10 min") or Schedule-based (exact) (departures land on exact clock multiples of the headway).
A trip can have several non-overlapping windows — peak vs. midday vs. evening headways. The validator flags overlapping windows, an end at or before the start, and a non-positive headway. Trade-offs between this and explicit times:
Trade-offs:
- Explicit times: more accurate for irregular service, easier for downstream consumers to display, lets you model timepoints and slack precisely.
- Frequencies: dramatically smaller feed for high-frequency service (a 5-minute headway over 14 hours is 168 trips of explicit times vs. one frequency record), easier to maintain when the headway changes.
Most agencies use explicit times for everything because some downstream consumers handle frequencies awkwardly. High-frequency urban rail and BRT are the typical exception.
Duplicating a trip in the other direction
An outbound trip and its inbound counterpart aren't automatic — you have to create both. The editor's Duplicate action creates a copy on the opposite direction with the stop times reversed; refine from there. For most agencies the outbound and inbound runtimes are similar but not identical (turn lanes, peak-direction congestion).
Patterns: picking the shape a trip belongs to
A route can have more than one shape per direction — a peak express variant, a weekend deviation, a short-turn that only covers half the line (see Routes & shapes). In GTFS·X each shape carries its own ordered stop list, so the timetable's columns are the stops of the shape you're working on, not a single direction-wide list.
The selector at the top of the timetable is a pattern dropdown that lists each shape by name ("Outbound — express", "Weekend deviation") and switches the grid — its columns, its trips — to that shape. The dropdown is what makes same-direction variants reachable: two outbound shapes look identical to a two-way direction toggle, so name your shapes and pick from the list.
Selecting a pattern filters the trip grid to trips on that shape. New trips you add inherit the selected shape, so their stop columns line up. If you're authoring a short-turn variant, switch to its shape first, then add its trips — they'll reference the subset of stops that shape serves.
Rebuilding a pattern: trip-less shapes & Remove All Trips
A shape stays a first-class pattern even when it has zero trips, as long as it still has stops. That's deliberate: it lets you rebuild a timetable from scratch without losing the alignment or the stop placement. The flow is change the stop order → remove all the trips → add one clean trip → replicate it by headway.
The Remove All Trips button (top of the timetable, shown when the current view has trips) clears every trip in the current pattern/direction view — and their stop times — after a confirm. It explicitly keeps the shape and its stops, so the pattern stays in the dropdown with an empty grid, ready for you to add a fresh trip and use Repeat Every… to spawn the new schedule. Use it when a schedule change is large enough that fixing trips one by one is slower than rebuilding: a frequency overhaul, a runtime retiming, a span change.
Because trip-less-but-stop-bearing shapes remain selectable, you can also start a brand-new pattern by drawing and stopping a shape, placing its stops, and authoring trips later — the pattern is usable the moment it has stops, trips or not.
Vehicle blocks (block_id)
A block is the set of trips one physical vehicle runs in sequence over a service day — finish an outbound trip on Route 5, deadhead over, and start an inbound on Route 12, all on the same bus. Trips in the same block share a block_id, which lets trip planners offer "stay on board" transfers and lets the Service Summary count peak vehicles correctly.
Assign blocks in the Blocks panel (left rail). It groups every trip by its block id — assigned blocks first, then an Unassigned group — and you set or change a trip's block by typing the id into the field next to it. Trips with no block id are perfectly valid; blocking is optional and most useful when vehicles interline between routes.
The panel flags a conflict: if two trips in the same block and the same service day overlap in time, they're marked with a ⚠ overlap — one vehicle can't run two trips at once, so that's a modeling error to fix (usually a wrong block id or a typo in a stop time). You can also set block_id inline from a route's Trips tab, in the Block column, when you're working route-by-route.
Edge cases and gotchas
- Times can exceed 24:00:00. A trip that starts at 11:45 PM and ends after midnight has stop times like 23:45:00, 24:15:00, 24:42:00. The GTFS spec allows this and you should use it — splitting the trip at midnight breaks trip-planner continuity.
- Stop times must monotonically increase. The validator flags a trip where stop_sequence[3]'s time is earlier than stop_sequence[2]'s. Usually a typo (forgot the leading hour); occasionally an honest interpolation that ran too fast at an intermediate point.
- Different trips on the same route can serve different stops. A short-turn variant that only goes downtown-to-midpoint is a separate set of trips that reference a subset of the route's stops. The editor handles this — each trip's grid row shows only the stops the trip actually visits.
- Don't pad timepoints with fake stops. If a route has 30 stops but only 6 timepoints, populate the 6 timepoints and let intermediate stops interpolate. Pulling timepoint values forward to every intermediate stop pretends to a precision the operator can't actually deliver.
See also
- Routes & shapes — the shape geometry drives interpolation.
- Service calendars — every trip references a service pattern from here.
- Stops — the columns of the grid.
- Service summary — derives revenue hours and peak-vehicle counts from the trips you author here.
- Route visibility — hide and show routes; cost and coverage re-scope to the visible subset.